Hello.
I have a general question about the nitty gritty details of creating a background from a DVD for which I'm hoping I can get some help. I've done a good bit of internet searching on this topic, but haven't quite come across a real "for dummies" guide to creating your own background for a cel. If this exists and I have missed it, please point me in the right direction, but what I'm hoping to compile is a real step-by-step (with silly details attached) description of this process.
For some of you who have experience or more know-how, how have you done this exactly, or how have you known it to be done? The process, as I would suspect, would be this, but for those who would have a kind moment, please offer any corrections or additions:
1) Pop in the DVD of the desired show/episode into your computer.
2) If possible, find a frame with the desired background with nothing else over it and pause the DVD. I assume if this is not possible, either pause on the frame where your cel is to later layer it over, or find a frame with the same background with little else over it in hopes of later photoshopping anything else out (?).
3) Take a screenshot (using "print screen?"), then paste into photoshop or an image editor of your choice.
4) Touch up the image by resizing and/or editing anything else out (any tips on maximizing the image quality?).
5) Save it and take it to Kinko's or the like to have them print it on a high-quality paper.
6) Bag your cel separately from your new background and enjoy its new display in your portfolio.
Roughly accurate? Completely wrong?
I am a novice cel collector, but have a strong interest in conservation and these types of technical details. I appreciate anyone's help and hope to get to the point where I will be able to answer as many questions for others as I ask. As a service back to the community, if we're able to get a good discussion completed on this topic, I'll be happy to compile everything and post it in a separate how-to guide in this subforum for anyone in the future with the same question.
Thanks in advance. I'll monitor closely and may have some followup questions.
-Jet
Cel Background Creation Question(s)
-
BuraddoRun

- Kamisama - God
- Posts: 208
- Joined: Mon Nov 26, 2012 6:48 pm
- Location: Texas
- Contact:
Re: Cel Background Creation Question(s)
Awesome topic, Jet! I don't have any advice, unfortunately, but I do appreciate you attempting to get something like this started and compiled for those of us (including you) who want to try and do this for our backgroundless cels.
"Come now, let us reason together," says the LORD. "Though your sins are like scarlet, they shall be as white as snow; though they are red as crimson, they shall be like wool." -Isaiah 1:18
Re: Cel Background Creation Question(s)
I did a bit of experimentation with this topic over the past week and wanted to share my experience.
The target was to make a background to match a cel I own from a DVD. I picked something I thought would be relatively simpler for a first go at a project like this. My experience in doing things like this is rather limited, but I have done a little recreational image editing on computer.
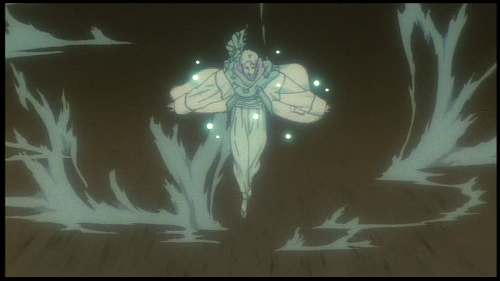
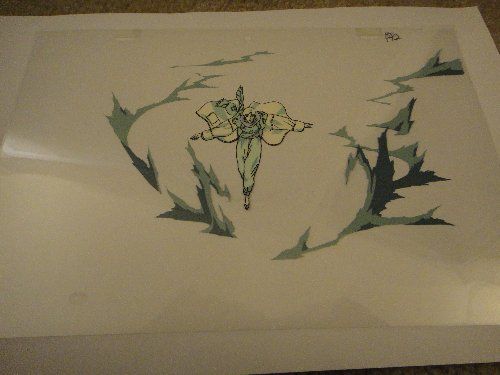
The cel--one from Vampire Hunter D: Bloodlust of Grove chasing the carriage through Barbarois territory. As I don't have a good scanner, this screenshot is an approximation of the cel. Of course, envision it without a background (edit: see ironic postscript below).
Of note, the background in this scene is dynamic, with motion blur constantly moving/changing. Also of note, I was hoping as the character came into the scene, there would be a frame or two of just the background so I could screenshot that, print, voila, but that was not the case.
I loaded the DVD initially with Windows Media Player with the intention to pause on the frame I wished to use, maximize, snap a screenshot using the "print screen" key, and paste that into my image editor of choice Paint Shop Pro. Interestingly, that did not prove to be as straightforward as expected, as the screenshot did funny things when pasted. I found through Google search that your computer's video hardware acceleration must be disabled for this process to work properly, so if anyone wishes to go this route, first disable hardware acceleration (in Windows XP: display-> properties-> settings-> advanced-> troubleshoot).
Around the time I figured out how to get the above to work, I scrapped the idea and went with VLC player. It has a "snapshot" option to take a screenshot regardless of the hardware acceleration matters above. I suspect other, better video players also have a screenshot option, and I would recommend just going this route.
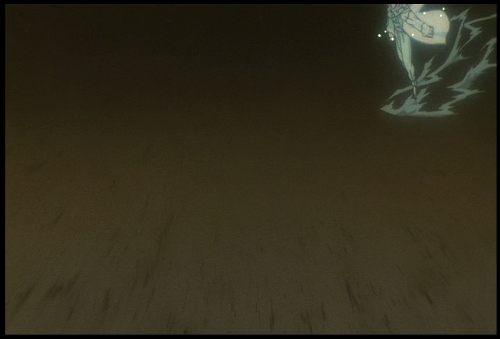
As the background in the scene changes from frame to frame ever so slightly, and I'm just doing this to display for my enjoyment, I wasn't concerned with matching the exact background frame to the cel. Therefore, I picked a frame that would require the least amount of editing. I chose this one through VLC player snapshot (and discovered snapshot copies at the same resolution regardless of VLC window size, maximization, etc.) with the intention of editing the character out of the image:
The fine-tuning began here. Two things needed to be done--the screenshot needed to be enlarged to match the size of the cel, and poor Grove had to be removed from the image. I used a ruler to measure the cel and for display purposes, chose to resize the background image (simple option in any image editor) to match the exact dimensions of the cel, though this did throw the aspect ratio off slightly.
Next was editing the character out (this, I'm really curious to know if anyone has suggestions for). If this is what it takes to create a background, the editing process will be different from case to case, so I didn't snap any screenshots for tutorial purposes, but after some rudimentary editing and color blending, this was the result:

I have yet to physically print it, but the next step is to take it to Kinko's and have them do that on a couple different types of paper to see what displays best. I'll update, and if I can't find a way to scan the results, I'll at least snap a couple digital photos of before and after.
(Ironic postscript: my cel, it turns out, is actually from a sequence a few seconds later, which, yes, does have a different background)
I am still very curious to know if anyone else has tried a similar process and how they went about doing it.
The target was to make a background to match a cel I own from a DVD. I picked something I thought would be relatively simpler for a first go at a project like this. My experience in doing things like this is rather limited, but I have done a little recreational image editing on computer.
The cel--one from Vampire Hunter D: Bloodlust of Grove chasing the carriage through Barbarois territory. As I don't have a good scanner, this screenshot is an approximation of the cel. Of course, envision it without a background (edit: see ironic postscript below).
Of note, the background in this scene is dynamic, with motion blur constantly moving/changing. Also of note, I was hoping as the character came into the scene, there would be a frame or two of just the background so I could screenshot that, print, voila, but that was not the case.
I loaded the DVD initially with Windows Media Player with the intention to pause on the frame I wished to use, maximize, snap a screenshot using the "print screen" key, and paste that into my image editor of choice Paint Shop Pro. Interestingly, that did not prove to be as straightforward as expected, as the screenshot did funny things when pasted. I found through Google search that your computer's video hardware acceleration must be disabled for this process to work properly, so if anyone wishes to go this route, first disable hardware acceleration (in Windows XP: display-> properties-> settings-> advanced-> troubleshoot).
Around the time I figured out how to get the above to work, I scrapped the idea and went with VLC player. It has a "snapshot" option to take a screenshot regardless of the hardware acceleration matters above. I suspect other, better video players also have a screenshot option, and I would recommend just going this route.
As the background in the scene changes from frame to frame ever so slightly, and I'm just doing this to display for my enjoyment, I wasn't concerned with matching the exact background frame to the cel. Therefore, I picked a frame that would require the least amount of editing. I chose this one through VLC player snapshot (and discovered snapshot copies at the same resolution regardless of VLC window size, maximization, etc.) with the intention of editing the character out of the image:
The fine-tuning began here. Two things needed to be done--the screenshot needed to be enlarged to match the size of the cel, and poor Grove had to be removed from the image. I used a ruler to measure the cel and for display purposes, chose to resize the background image (simple option in any image editor) to match the exact dimensions of the cel, though this did throw the aspect ratio off slightly.
Next was editing the character out (this, I'm really curious to know if anyone has suggestions for). If this is what it takes to create a background, the editing process will be different from case to case, so I didn't snap any screenshots for tutorial purposes, but after some rudimentary editing and color blending, this was the result:
I have yet to physically print it, but the next step is to take it to Kinko's and have them do that on a couple different types of paper to see what displays best. I'll update, and if I can't find a way to scan the results, I'll at least snap a couple digital photos of before and after.
(Ironic postscript: my cel, it turns out, is actually from a sequence a few seconds later, which, yes, does have a different background)
I am still very curious to know if anyone else has tried a similar process and how they went about doing it.
-
BuraddoRun
- Kamisama - God
- Posts: 208
- Joined: Mon Nov 26, 2012 6:48 pm
- Location: Texas
- Contact:
Re: Cel Background Creation Question(s)
Have you read this topic?
viewtopic.php?f=61&t=28912
There are a couple of tips in there, such as taking multiple screenshots in a scene in order to piece the full background together. If the cel layers move across the same static background, then you may be able to cut and paste the pieces of that bg from different screenshots and get the entire actual bg that way. If your full background is never seen, then if your bg image is symmetrical (like it is more or less in the image you used above), then maybe you can copy one side (like the left corner), mirror it with some image editing program, and paste it over the other side (the right corner).
I'm anxious to see what you come up with after you print your background.
"Come now, let us reason together," says the LORD. "Though your sins are like scarlet, they shall be as white as snow; though they are red as crimson, they shall be like wool." -Isaiah 1:18
Re: Cel Background Creation Question(s)
Hey BuraddoRun, thanks for the reply. Those are all solid points.
I did see that topic actually. I've considered sensei's good suggestion of adding a solid, complementary color behind a cel. I know it nags at me though and I would like to learn how to create a replica of the background of the scene. I actually enjoy little projects like this, and with a very small collection like mine, don't mind putting as much time into scene creation as adding new cels to the collection.
pixie_princess's and ceogbdd's posts did allude to the process of background creation, but without many of those nitty-gritty details I am wondering about--which video program to use to take the screenshot, resolution considerations, any particular best image format to use (png, gif, jpeg, etc.), tips for editing in photoshop, printing tips when all said and done for best effect, things like that.
For mine, I did actually more or less what you suggested--copied the upper left corner, mirrored it and pasted as a new selection, then tried to color blend out the faint lines remaining after pasting as much as possible. If the background weren't dynamic, I would have tried like ceogbdd suggested and take another screenshot when that upper right corner was not covered by the character, copy that, and paste it in to the original.
If pixie_princess or ceogbdd happen upon this thread and are able to share any expertise, or anyone else with know-how, I'm all ears.
I did see that topic actually. I've considered sensei's good suggestion of adding a solid, complementary color behind a cel. I know it nags at me though
pixie_princess's and ceogbdd's posts did allude to the process of background creation, but without many of those nitty-gritty details I am wondering about--which video program to use to take the screenshot, resolution considerations, any particular best image format to use (png, gif, jpeg, etc.), tips for editing in photoshop, printing tips when all said and done for best effect, things like that.
For mine, I did actually more or less what you suggested--copied the upper left corner, mirrored it and pasted as a new selection, then tried to color blend out the faint lines remaining after pasting as much as possible. If the background weren't dynamic, I would have tried like ceogbdd suggested and take another screenshot when that upper right corner was not covered by the character, copy that, and paste it in to the original.
If pixie_princess or ceogbdd happen upon this thread and are able to share any expertise, or anyone else with know-how, I'm all ears.
Last edited by Jet on Wed Feb 06, 2013 8:27 pm, edited 1 time in total.
-
pixie_princess

- Kamisama - God
- Posts: 252
- Joined: Tue Jul 05, 2005 7:44 pm
- Location: USA
- Contact:
Re: Cel Background Creation Question(s)
Jet wrote:Hey BuraddoRun, thanks for the reply. Those are all solid points.
I did see that topic actually. I've considered sensei's good suggestion of adding a solid, complementary color behind a cel. I know it nags at me though
pixie_princess's and ceogbdd's posts did allude to the process of background creation, but without many of those nitty-gritty details I am wondering about--which video program to use to take the screenshot, resolution considerations, any particular best image format to use (png, gif, jpeg, etc.), tips for editing in photoshop, printing tips when all said and done for best effect, things like that.
For mine, I did actually more or less what you suggested--copied the upper left corner, mirrored it and pasted as a new selection, then tried to color blend out the faint lines remaining after pasting as much as possible. If the background weren't dynamic, I would have tried like ceogbdd suggested and take another screenshot when that upper right corner was not covered by the character, copy that, and paste it in to the original.
If pixie_princess or ceogbdd happen upon this thread and are able to share any expertise, or anyone else with know-how, I'm all ears.
Unrelatedly, I noticed when checking this thread on my mobile device's browser, my linked images in the post above did not show up. This wasn't the case with other posts using linked images. If anyone knows why this may be and has a kind moment to drop me a private message, I'll thank you in advance.
I know somewhere around here there is a post floating around in the ether of the interwebs about how I make my backgrounds. Closest thing I could find was a blog entry:
re: Breathing life into cels in my underground lab Thursday, July 19, 2007 - 7:38:02 AM
galexia
Usually, I have a few screencaps to work from as my base. Or, sometimes I just look at them for reference. I know that most of the time, the screencaps are going to look kind of muted in color tones, so I find a color that is just a shade or so brighter that I think would look right, and use that. If I have absolutely no idea where a cel is from, I''ll just use either a "stunt background" or just make something from scratch, or maybe even a photograph I''ve taken. It just depends on what looks right.
which video program to use to take the screenshot, resolution considerations, any particular best image format to use (png, gif, jpeg, etc.), tips for editing in photoshop, printing tips when all said and done for best effect, things like that.
I use a screen capture and paste it into photoshop elements 5 (before that adobe photoshop 4 or something ). For I while I used fraps when I had problems capturing images.
I make sure everything seems to be in scale, and you want to make sure that it will print out right so at least 300dpi. Though to be honest, I work on my backgrounds at 600dpi if only because I'd rather go from big to little than have to go the opposite way and make everything uber grainy. I do my originals in psd in layers. Only merge/flatten when it is done, and then save a copy as a jpeg since it is the most common fileformat. Tips for editing... Practice makes perfect. Save every 10 minutes lest a power outage rears its ugly head or the computer crashes. Multiple layers are good. Make sure you have some of the layers copied (but invisible) before doing something drastic to a layer so that you don't lose tons of work. Practice. Don't be afraid of scrapping a particular layer or going back and completely reworking it.
First Background I worked on:
http://galexia.rubberslug.com/gallery/i ... emID=72090
First Animation Cel -Very simple to make. My suggestion is to start off simple.
Usagi from episode 181 in the nightclub.
http://galexia.rubberslug.com/gallery/i ... mID=238759
This one is done on multiple layers, doing the largest part first, and slowly working in the details, and then working with the shading. Screencap at bottom of screen.
Most recent background:
Chibichibi with Incense burner episode 193
http://galexia.rubberslug.com/gallery/i ... mID=305900
I do not paint, but from the pbs shows I watched as a kid ( Lets add a happy little tree here was a common phrase I think), making these backgrounds is like painting. You have a basic outline, you start painting, you work it up in layers. Started off with the base color -yellow/ivory (bottom layer) and work up from there.
Re: Cel Background Creation Question(s)
Thank you very much for the reply. Your work looks great.
I'm certainly coming at this from the angle of someone with limited experience, and hopefully am not biting off more than I can chew. I'm going to practice at it.
Interestingly, recreating a background from the ground up is actually something I hadn't quite thought about--I assumed most of the time people were cutting and pasting to merge multiple screen captures.
I'm getting to this late tonight, so no specific followup questions are jumping to mind, but if they do, I may hope to pick your brain a bit more.
Fan of the "happy trees" here too by the way, but I always cringed when, toward the end of the half hour, the inevitable "let's get a little crazy" would come out and you knew a big black line was about to be painted right across the nice landscape. Always had a way of turning out well in the end, though.
I'm certainly coming at this from the angle of someone with limited experience, and hopefully am not biting off more than I can chew. I'm going to practice at it
Interestingly, recreating a background from the ground up is actually something I hadn't quite thought about--I assumed most of the time people were cutting and pasting to merge multiple screen captures.
I'm getting to this late tonight, so no specific followup questions are jumping to mind, but if they do, I may hope to pick your brain a bit more.
Fan of the "happy trees" here too by the way, but I always cringed when, toward the end of the half hour, the inevitable "let's get a little crazy" would come out and you knew a big black line was about to be painted right across the nice landscape. Always had a way of turning out well in the end, though.
Re: Cel Background Creation Question(s)
Posting with an update and some before/after pictures for any who may be interested.
I took the above image file to Fedex/Kinkos and had them laser print it on a few different papers. This is my experience, and I suspect it may differ based on computer program used, and type of printer and paper used.
I had it initially printed on white 80-pound cardstock. I was hoping to end with a nice solid paper to serve as a background. Unfortunately this came out much too dark--it was essentially a black rectangle.
I took the file back home and toyed with the brightness and lightness variables, and saved one with an additional brightness 15%, and one with a lightness 75% and one with 100%. I tried the brightest possible on the cardstock again, and it was unfortunately again too dark.
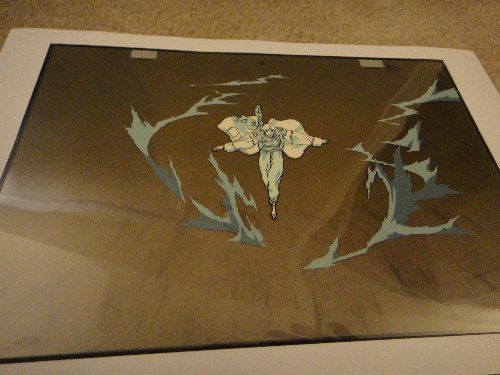
I next tried all of the options on white 32 pound paper. Unfortunately again, results were mixed and ultimately not great. The colormatching was a problem, which the nice person helping me gently pointed out multiple times Fedex cannot guarantee. The seemingly best result was lightness 75% on 32 pound paper. I do not have a scanner capable of handling the cel/background, but snapped a photo with and without the background:
Thanks to those who have commented. My quest for improving this process continues.
I took the above image file to Fedex/Kinkos and had them laser print it on a few different papers. This is my experience, and I suspect it may differ based on computer program used, and type of printer and paper used.
I had it initially printed on white 80-pound cardstock. I was hoping to end with a nice solid paper to serve as a background. Unfortunately this came out much too dark--it was essentially a black rectangle.
I took the file back home and toyed with the brightness and lightness variables, and saved one with an additional brightness 15%, and one with a lightness 75% and one with 100%. I tried the brightest possible on the cardstock again, and it was unfortunately again too dark.
I next tried all of the options on white 32 pound paper. Unfortunately again, results were mixed and ultimately not great. The colormatching was a problem, which the nice person helping me gently pointed out multiple times Fedex cannot guarantee. The seemingly best result was lightness 75% on 32 pound paper. I do not have a scanner capable of handling the cel/background, but snapped a photo with and without the background:
Thanks to those who have commented. My quest for improving this process continues.